Administrators can create multiple user accounts at once using a CSV file. This workflow streamlines onboarding for teams, departments, and entire organizations. Passwords may be included in the CSV or left empty. If left empty, the system creates the user without password blocking each login until the password is either set by an administrator or by the user via the Forgot Password function.
Important: The Forgot Password flow requires a working mail server configuration. See 4.3 Mail Server Requirement before importing passwordless users.
1. Overview
Bulk user creation enables administrators to:
- Upload a CSV file containing multiple user records
- Specify passwords manually or rely on automatic password generation
- Include optional metadata such as job titles and organizational units
All accounts created through CSV import are assigned the Default User role automatically.
Passwords generated by the system are not displayed to administrators.
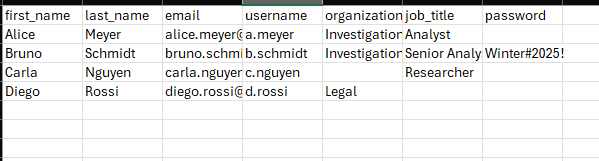
2. Preparing the CSV File
CSV files used for bulk user creation must use the following snake_case column names:
| Column | Required | Description |
|---|---|---|
first_name | Yes | First name of the user |
last_name | Yes | Last name of the user |
email | Yes | Email address used for password resets |
username | Yes | Username used for login |
organizational_unit | No | Optional organizational unit or department |
job_title | No | Optional job title or role label |
password | No | Password; leave empty to generate it later by the user or the |
Field behavior
passwordempty → an unusable password is set by the framework
The account is created with an unusable password (Django). The user cannot log in until either:- they set a password via Forgot Password (mail server required), or
- an administrator sets a password and shares it externally.
job_titleempty → User is created without a job titleorganizational_unitempty → User is created without an OU- All CSV-created accounts become Default Users
CSV separator: Use a semicolon (;) as the field delimiter.
Some editors (e.g., LibreOffice) may change delimiters automatically if multiple separators are configured. When exporting/saving as CSV, explicitly select “;” to avoid import errors.
3. Creating Users from a CSV File
The CSV upload dialog allows administrators to create multiple users in a single step.
3.1 Opening the CSV Upload Dialog
- Navigate to System Settings.
- Select Users

- Open the Upload CSV dropdown.

- (Recommended) Choose CSV Sample to download a correctly formatted CSV template or download the sample attached to this article.
3.2 Uploading a CSV File
- Open the Upload CSV dialog.

- Upload your CSV by:
- selecting it via the file explorer, or
- dragging and dropping the file into the dialog window
- Once the file is added, choose one of the following:
- Upload file — begins the creation process
- Upload different file — clears the current file to upload another

3.3 Processing the File
- Click Upload file to start the import.
- The system displays a message indicating:
- how many users were created
- how many user records failed (if any)
- If any records fail, an additional window lists each failed entry and the related error message.
- If all records succeed, only the message appears.
4. Password Handling
4.1 If a password is included in the CSV
- The user account is created with the provided password.
- This password must be shared with the user outside of the system.
4.2 If the password field is empty
- The account is created with an unusable password (Django default when no password is set).
- The user cannot log in until a usable password is set.
First-time login for users without a known password
Option1:
- Open the login page.
- Click Forgot Password.
- Enter their email address.
- Complete the password reset process.
Option 2:
An administrator sets a password manually and shares it externally with the user.
4.3 Mail Server Requirement
When a user is created without a password, the user must set their initial password through Forgot Password. This requires the system to send a password-reset email.
- Ensure the mail server is configured and active before importing passwordless users.
- If the mail server is not configured, users created without a password cannot log in until:
- a password is manually assigned and shared externally, or
- the mail server configuration is completed and a reset email can be sent.
5. Validation and Common Errors
The importer validates each row independently. Errors may occur if:
- Required fields are missing (
first_name,last_name,email,username) - Emails are invalid
- A username already exists
- CSV column names do not match the expected structure
- The CSV file uses unsupported formatting
- Organizational units were not created beforehand
Only valid rows are created. Invalid rows must be corrected and re-uploaded.
6. When to Use Bulk Import
| Scenario | Recommended Method |
|---|---|
| Creating one or two accounts | Manual creation |
| Onboarding a team or department | Bulk import via CSV |
| Creating accounts without assigning passwords | Leave password empty + Forgot Password flow |
| Migrating users from external systems | Bulk import via CSV |
7. Best Practices
- Use the CSV Sample file to ensure correct formatting.
- Keep organizational naming consistent.
- Prefer automatic password generation.
- Instruct users how to log in via the Forgot Password flow.
- Delete CSV files after import if they contain sensitive data.